
When you start learning to make dolls it can be hard to know what sewing tools you need. In this guide, I share the tools that I think are essential and some I have discovered that make sewing dolls quicker and easier.
Cutting tools
Sharp fabric scissors help keep your cutting accurate. When you are making dolls you are working at a smaller scale, so there is less room for mistakes. It's worth spending a little more and choosing a high-quality pair. If you look after them well, they will last you a lifetime.
I'm a big fan of Fiskars fabric scissors which I've been using for over a decade, and they are still as sharp as ever. I use the Fiskars sharpener to sharpen the blades.
Never use fabric scissors for cutting paper or anything else that will make them blunt. I like that Fiskars scissors have a bright orange handle. It makes them easy to spot, and everyone in our house knows never to use the orange scissors for anything other than fabric!
You will also need smaller sewing scissors for snipping threads, cutting little pieces from fabric and clipping curves.

You should have a third set of general-purpose scissors for cutting paper pattern pieces.
I sometimes use a fabric rotary cutter for pieces that have long, straight edges, such as skirts. It is quick and easy to cut straight lines this way. I use a self-healing cutting mat to protect my table, whether using a rotary cutter or scissors.
The other type of scissors that I use all of the time is pinking shears. Pinking shears have jagged blades that cut a zig-zag pattern. When sewing a curved edge you should cut into the seam allowance so that the fabric can stretch to create a smooth, round edge. You can use small scissors to make cuts in the seam allowance, but I find pinking shears are quicker and easier to use.
I use pinking shears to trim all seam allowances (not just the curved edges) when I sew dolls. It removes some of the bulk fabric which makes turning pieces the right side out easier. You can also use pinking shears to finish the seams on doll clothes made with lightweight fabrics that don't fray, such as cotton.

Pins
I recommend using glass or plastic headed pins when making dolls. They are easy to see and less likely to get left in a doll accidentally.
My favourite pins are made by Clover. I use their fine patchwork pins for pinning together most fabrics. I also use their extra-fine patchwork pins when pinning thin fabrics, such as cotton lawn or lining fabric. I like to use the extra-fine pins if I'm pinning things to a doll's face once it is stuffed, as they leave smaller holes.
Throw out any bent pins because they won't accurately hold your pattern pieces together.
Temporary fabric glue stick
My mum introduced me to basting glue which she uses for quilting. It is a temporary glue stick for fabric which disappears once you've used it. It is a revelation! I use it to stick tiny pattern pieces to the fabric so I can cut them out without the need for pins. It is not essential for doll making, but it makes cutting small pieces like felt flowers easier, and you are more likely to cut them accurately.
Flexible measuring tape
If you've ever tried measuring around a doll's head with a ruler, you will know how tricky it is! I use a flexible measuring tape instead. You can wrap it around the curved edges of the doll's head to measure and draw the face. Look for a thin, retractable one rather than the type used by dressmakers. They are much more suited to doll making.

Seam ripper
A seam ripper is used to cut and remove stitches. No matter how long you have been sewing, mistakes happen. The wonderful thing is that sewing mistakes are usually entirely removable!
Iron and ironing board
A steam iron and an ironing board are essential for doll making. It can be tempting to skip using an iron, but it makes a difference in how polished and professional your doll and its clothes look. Pressed seams are also quicker and easier to sew.
Ironing your fabric before cutting it will help ensure that your pattern pieces are accurately cut. When the instructions ask you to press a seam, don't iron it back and forth like you would when ironing clothes. Instead, lift the iron up and down onto the fabric using light pressure. Doing this allows the stitches to meld into the fabric so that they are flatter and less noticeable, giving a smooth finish.
I also use a sleeve ironing board to iron small doll clothes
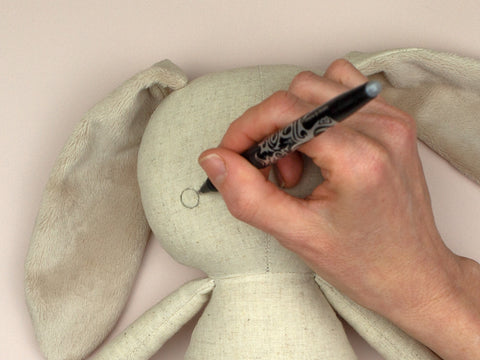
Fabric markers
I have tried all sorts of erasable fabric pens over the years, but the ones I love the most are Frixion erasable pens. They look like regular pens but have magic ink that disappears with heat. I use them to make marks on doll clothes, using an iron to erase them afterwards. I also use them to draw doll faces. You can draw clear, detailed lines with them to help you accurately sew a doll's face. I use a hairdryer to remove the ink afterwards.
I don't recommend the fabric pens with purple ink that say they disappear in 24 hours. I find that they always disappear in a matter of minutes!
I also use a tailor's chalk pen if I am making marks on dark fabrics. They are easier to draw with than traditional tailor's chalk.
Sewing machine needles
It's incredible how something as small as a needle can make a big difference to your sewing experience! Using the right one for your fabric can create perfect stitches. The wrong one (or a worn or damaged one) can cause headaches such as skipped or uneven stitches, broken threads and holes or tears in your fabric.
Before you start making a new doll, make sure the needle in your machine is sharp and the right size for your fabric. I learnt this the hard way!
Needles come in different sizes. The two I use most for doll making are universal needles in size 80/12, which I use for most cotton and linen fabrics; and 60/8 for very fine fabrics, such as cotton lawn or lining fabric. If the needle keeps breaking, it is a sign you might need to go up a needle size.
Before starting a new doll, always check if your needle needs replacing, especially if you've been using it for more than a few hours. Skipped stitches or a knocking sound when you sew are signs that it is time for a new needle. Needles can get damaged if you accidentally hit a pin or the needle plate while sewing. It can cause the top thread to keep breaking - or even worse - small holes or tears in your fabric.
Needles for hand sewing
Hand sewing needles come in varying sizes with different types of points.
The most commonly used hand sewing needles are called sharps, and they are suitable for most fabrics. Use them to attach the limbs to your doll. You will need an embroidery needle to sew the doll's face.
The other needle I recommend using is a doll needle. They are long needles that can reach from one side of the doll's body to the other. They are great for hiding the ends of threads inside the doll's body and attaching arms.

Stuffing and turning tools
Hemostats are my absolute favourite tool for making dolls. I use them all the time. Although they look like scissors, they don't have sharp edges and can't cut anything. Instead, the tips grasp things.
I use them for turning pieces the right side out and for stuffing. They grasp onto the stuffing and can reach into parts of the body that are difficult to get to with your hands. They speed the whole process up and are a worthwhile investment if you plan to make more than one doll.
Hemostats are surgical forceps and come in lots of different sizes. I recommend buying ones that are between 5 - 6" (12.5 - 15cm) for making dolls.

Another of my favourites is a turning tool. It is a long thin stick and a tube used to turn arms and legs the right side out quickly and easily. Insert the tube inside the limb until it reaches the tip. With the stick on the outside, gently push the fabric into the tube opening to start turning the fabric. Gently remove the tube and continue to push the stick into the fabric until the limb is the right side out. You can also use the stick to push stuffing into hard to reach places and for pressing out corners when you are making clothes.
You can make a turning tool yourself at home using a chopstick and a metal straw.

Sewing machine thread
When I first started sewing, I bought whatever thread I found in the store - usually the cheapest! I soon realised that some are thin and break easily, which is frustrating when you have to rethread your machine all the time. It's not ideal when sewing doll's bodies either, as the seams need to be strong to hold the stuffing.
Then I discovered Gutermann threads. They cost a bit more, but they are worth it - even if you only use them for sewing the doll's body. I also use them for hand sewing when attaching limbs to the doll, or closing up an opening in the body using a ladder stitch.
Choose a thread that is a shade lighter than the fabric you are using, especially when you sew the doll's body. Lighter-coloured stitching is less likely to show than stitches darker than your fabric.
Embroidery thread
Use embroidery thread or floss to sew doll's faces. I use DMC. It is a loosely twisted six-strand cotton thread that is available in lots of diferent colours. I often separate one, two or three strands from a length of floss to create thinner lines for the doll's face.
Stuffing
Polyester stuffing (also known as polyfill or fiberfill) is a popular choice for making dolls because it is lightweight and cheap. You could also use wool or other natural fibres such as bamboo or cotton. I recommend buying the best stuffing you can afford. The cheaper, unbranded options may 'look and feel' the same as some of the more expensive ones through the bag, but they often result in lumpy dolls that don't hold their shape well over time.
Blush
There are lots of ways to give a doll rosy cheeks. You can use colouring pencils - I use artists' quality pencils as they last longer. Make up blush can also be used. Both options will eventually fade but can easily be retouched. Fabric paint or beeswax crayon are more permanent options.

I hope you have found this list helpful. You can find links to my favourite doll-making tools in my Amazon storefront. I would love to hear about your favourite doll making tools in the comments below.

Pin this image to save this guide to Pinterest
17 comments
Good afternoon! I want to buy your patterns, but I don’t see the price and where to pay
Bcs vendem os moldes? Tem aulas em português?
Hola, muy hermoso todo, donde puedo adquirir los moldes?
Gracias 😊
Gostaria de receber os moldes.
Hola! Quiero que me envíes moldes o patrones para que se los pueda hacer a mi nieta. Son muy bellos. Muchas gracias . Saludos desde la Patagonia Argentina.